This WooCommerce addon allows you to accept payments on your website using two different PayPal payment methods:
- PayPal Checkout: New PayPal payment buttons (PayPal, Debit/Credit Card, Venmo, Pay Later, etc.).
- PayPal Pro: On-site credit card checkout (customers enter their card details directly on your site).
This documentation page covers the PayPal Checkout payment option of this addon. For the PayPal Pro configuration, please refer to the PayPal Pro documentation page.
Table of Contents
- PayPal Checkout Overview
- Installation
- Configuring the PayPal Checkout Payment Option
- Testing with PayPal Sandbox
- Going Live
- How It Works for Customers
- Troubleshooting
- Frequently Asked Questions
- Can I use both PayPal Pro and PayPal Checkout at the same time?
- Do I need a PayPal Business account?
- Does PayPal Checkout work with the WooCommerce block-based checkout?
- Is it compatible with WooCommerce High-Performance Order Storage (HPOS)?
- What currencies are supported?
- Can my customers pay with a credit or debit card without a PayPal account?
PayPal Checkout Overview
The PayPal Checkout option uses PayPal’s Commerce Platform (PPCP) to offer new PayPal payment buttons on your WooCommerce checkout and cart pages. When enabled and configured, your customers can pay using:
- Their PayPal account
- Credit or debit card (via PayPal)
- Venmo (available for US-based customers)
- Pay Later options (where available)
The image below illustrates how the payment option will appear on your WooCommerce checkout page.
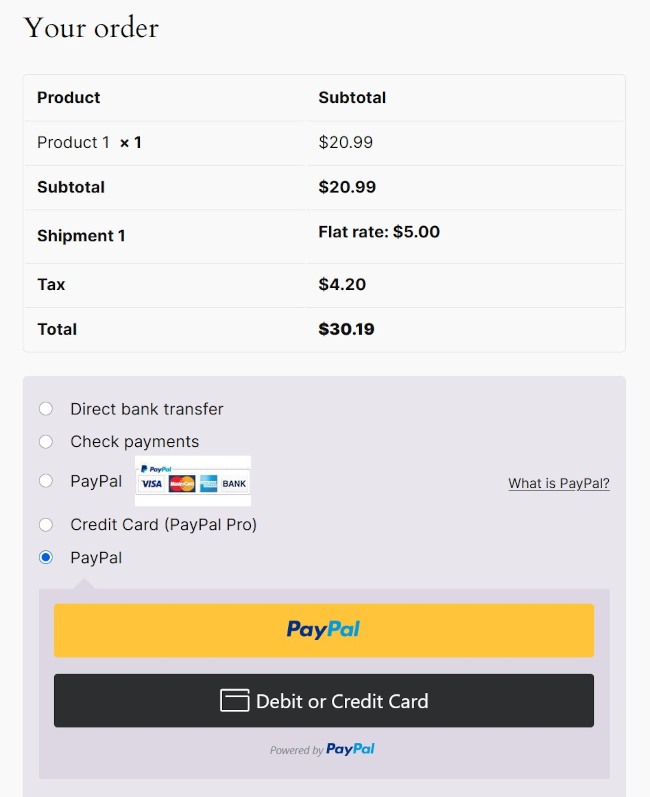
It works with both the legacy shortcode-based checkout page and the new WooCommerce block-based checkout page.
Installation
- Go to Plugins > Add New in your WordPress admin dashboard.
- Upload the addon’s zip file and activate it.
- Navigate to WooCommerce > Settings > Payments to see the available payment gateways.
You will see two payment methods from this addon:
- PayPal Pro: For on-site credit card checkout.
- PayPal Checkout: For the new PayPal payment buttons.
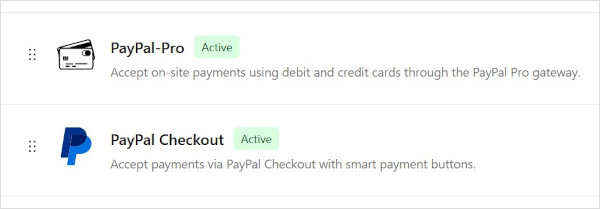
You can enable one or both of these payment methods depending on your needs.
Configuring the PayPal Checkout Payment Option
Follow the steps below to set up the PayPal Checkout gateway.
Step 1: Access the PayPal Checkout Settings
- Go to WooCommerce > Settings > Payments.
- Find PayPal Checkout in the list of payment methods.
- Click on “Mange” to open the settings page.
The settings page has three tabs: General, API Connection, and API Credentials.
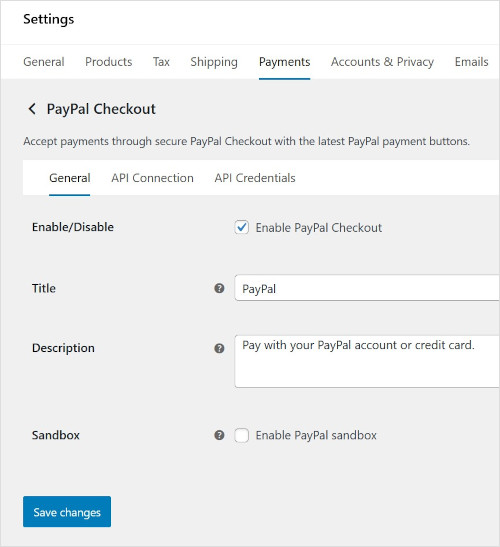
Step 2: General Settings
The General tab contains the following options:
Enable/Disable
Check this box to enable the PayPal Checkout payment gateway on your site. When enabled, the PayPal payment buttons will appear on your checkout and cart pages.
Title
This is the title that your customers will see during checkout for this payment option. The default value is “PayPal”. You can change it to something more descriptive like “PayPal / Credit Card” or “Pay with PayPal”.
Description
This is the description shown to customers on the checkout page under the payment method title. The default value is: “Pay with your PayPal account or credit card.” You can customize this to match your store’s tone.
Sandbox
Check this box to enable sandbox (test) mode. When sandbox mode is enabled, the gateway uses PayPal’s sandbox environment, allowing you to test payments without processing real transactions.
Important: Make sure to uncheck this box when you are ready to accept live (real) payments.
Step 3: Connect Your PayPal Account (API Connection)
The API Connection tab is where you connect your PayPal account to the plugin. This addon uses an automated onboarding process that makes it easy to link your PayPal account and obtain the required API credentials.
Connecting a Sandbox (Test) Account
To connect a sandbox account for testing:
- Go to the General tab and enable the Sandbox checkbox. Save the settings.
- Go to the API Connection tab.
- Under Sandbox Account Connection Status, you will see a message indicating that the sandbox account is not connected.
- Click the “Get PayPal Sandbox Credentials” button.
- A PayPal popup window will appear. Log in with your PayPal sandbox seller account credentials.
- Follow the prompts in the PayPal window to authorize the connection.
- Once the authorization is complete, the popup will close and the plugin will automatically retrieve and save your sandbox API credentials.
- After a successful connection, the status will update to show: “Sandbox account is connected.”
Note: You can create sandbox test accounts from the PayPal Developer Dashboard if you don’t already have one. You will need a sandbox “Business” account to act as the seller account.
Connecting a Live (Production) Account
To connect your live PayPal account for real transactions:
- Go to the General tab and make sure the Sandbox checkbox is unchecked. Save the settings.
- Go to the API Connection tab.
- Under Live Account Connection Status, you will see a message indicating that the live account is not connected.
- Click the “Get PayPal Live Credentials” button.
- A PayPal popup window will appear. Log in with your real PayPal Business account credentials.
- Follow the prompts to authorize the connection and grant permission to the app.
- Once the authorization is complete, the popup will close and the plugin will automatically retrieve and save your live API credentials.
- After a successful connection, the status will update to show: “Live account is connected.”
Disconnecting an Account
If you need to disconnect a connected account (for example, to reconnect with different credentials):
- Go to the API Connection tab.
- Click the “Disconnect” button next to the connected account (Sandbox or Live).
- Confirm the disconnection when prompted.
- The API credentials will be removed and you can reconnect using the onboarding button.
Delete Access Token Cache
The API Connection tab also has a “Delete Token Cache” button. Use this if you are experiencing issues with the PayPal API after changing or updating your API credentials. Clicking this button will clear the cached access token and force the plugin to generate a new one.
Step 4: API Credentials (Manual Entry)
The API Credentials tab shows the API credentials that were automatically filled in during the account connection process (Step 3). In most cases, you do not need to manually edit these fields.
However, if you prefer to enter the API credentials manually (instead of using the automated onboarding), you can do so here:
Live Client ID
Your PayPal live REST API Client ID. You can get this from the PayPal Developer Dashboard under your application’s credentials.
Live Client Secret
Your PayPal live REST API Client Secret. Available from the same location as the Client ID.
Sandbox Client ID
Your PayPal sandbox REST API Client ID. You can get this from the PayPal Developer Dashboard under your sandbox application’s credentials.
Sandbox Client Secret
Your PayPal sandbox REST API Client Secret.
Note: Using the automated onboarding process (Step 3) is the recommended and easiest way to obtain your API credentials. Manual entry is available as an alternative for advanced users.
Testing with PayPal Sandbox
Before going live, it is recommended to test the payment flow using PayPal’s sandbox environment.
Setting Up for Testing
- Enable Sandbox mode in the General tab (as described above).
- Connect your sandbox account via the API Connection tab.
- Create a sandbox “Personal” (buyer) test account from the PayPal Developer Dashboard to simulate a customer making a purchase.
Making a Test Purchase
- Go to your WooCommerce store’s front end.
- Add a product to the cart.
- Proceed to checkout.
- Select “PayPal” (or whatever title you configured) as the payment method.
- Click the PayPal button that appears.
- A PayPal popup will open. Log in with your sandbox buyer (Personal) account credentials.
- Approve the payment in the PayPal popup.
- The popup will close and the order will be completed on your WooCommerce store.
You can also test the PayPal button on the cart page. The plugin adds a PayPal button on the cart page as well, allowing customers to start the checkout process directly from the cart. On the cart page, clicking the PayPal button will open the PayPal popup, and after approval, the customer will be redirected to complete the order.
Verifying the Test Transaction
- Go to WooCommerce > Orders in your WordPress admin.
- Check that the test order was created with the correct details.
- You can also log in to your PayPal Sandbox Dashboard to verify the transaction on the PayPal side.
Going Live
When you are satisfied with the testing and ready to accept real payments:
- Go to the General tab and uncheck the Sandbox checkbox.
- Save the settings.
- Go to the API Connection tab and connect your live PayPal Business account using the “Get PayPal Live Credentials” button (if you haven’t already).
- Save the settings.
- Your store is now ready to accept real PayPal payments.
How It Works for Customers
Once the PayPal Checkout gateway is configured and enabled, here is what your customers will experience:
On the Checkout Page
- The customer selects the PayPal payment method.
- PayPal’s new payment buttons are displayed (PayPal, Debit/Credit Card, etc.).
- The customer clicks the PayPal button.
- A secure PayPal popup window opens where the customer logs in and approves the payment.
- After approval, the popup closes and the order is completed automatically.
On the Cart Page
- A PayPal button is displayed below the cart totals.
- The customer can click the PayPal button to start the checkout process directly from the cart.
- The PayPal popup opens for the customer to log in and approve the payment.
- After approval, the order is processed and completed.
Troubleshooting
PayPal buttons are not showing on the checkout page
- Make sure the PayPal Checkout gateway is enabled in the General settings tab.
- Verify that your API credentials are connected. Go to the API Connection tab and check the connection status.
- If you are in sandbox mode, make sure you have connected a sandbox account. If you are in live mode, make sure you have connected your live account.
- Clear any caching plugins on your site and try again.
Error after changing API credentials
- Go to the API Connection tab and click the “Delete Token Cache” button to clear the cached access token.
- This forces the plugin to generate a fresh access token using the new credentials.
PayPal popup opens but the payment fails
- If testing in sandbox mode, make sure you are using sandbox buyer account credentials (not your real PayPal credentials).
- Check that the store currency in WooCommerce matches a currency supported by PayPal.
- Try disconnecting and reconnecting the PayPal account from the API Connection tab.
Sandbox connection option is grayed out / not available
- To connect a sandbox account, you must first enable sandbox mode in the General settings tab and save. Then go to the API Connection tab.
- Similarly, to connect a live account, disable sandbox mode in the General settings tab and save.
“Nonce check failed” error during account connection
- This usually happens if the page was cached. Reload the settings page and try the connection process again.
- If you are using a caching plugin, try clearing the cache or temporarily disabling it before attempting the connection.
Frequently Asked Questions
Can I use both PayPal Pro and PayPal Checkout at the same time?
Yes. Both payment methods are registered as separate gateways in WooCommerce. You can enable one or both depending on your needs. PayPal Pro offers on-site credit card checkout, while PayPal Checkout offers the full PayPal experience with PayPal’s newest payment buttons.
Do I need a PayPal Business account?
Yes. To accept payments via PayPal Checkout, you need a PayPal Business account. If you only have a Personal account, you will need to upgrade it to a Business account on PayPal’s website.
Does PayPal Checkout work with the WooCommerce block-based checkout?
Yes. The PayPal Checkout option is compatible with both the legacy shortcode-based checkout page and the new WooCommerce block-based checkout page.
Is it compatible with WooCommerce High-Performance Order Storage (HPOS)?
Yes. This addon is compatible with the WooCommerce HPOS feature.
What currencies are supported?
PayPal Checkout supports whatever currency your WooCommerce store is configured to use, as long as it is a currency supported by PayPal. Check PayPal’s documentation for the full list of supported currencies.
Can my customers pay with a credit or debit card without a PayPal account?
Yes. PayPal’s payment buttons include a “Debit or Credit Card” option that allows customers to pay with a card without needing a PayPal account (availability depends on country and PayPal’s eligibility requirements).
For more details and support, please feel free to contact us.